| QuickPar | |
|
|
|
| Creating PAR2 files | Top | ||||||||||||||||||||||||||||||
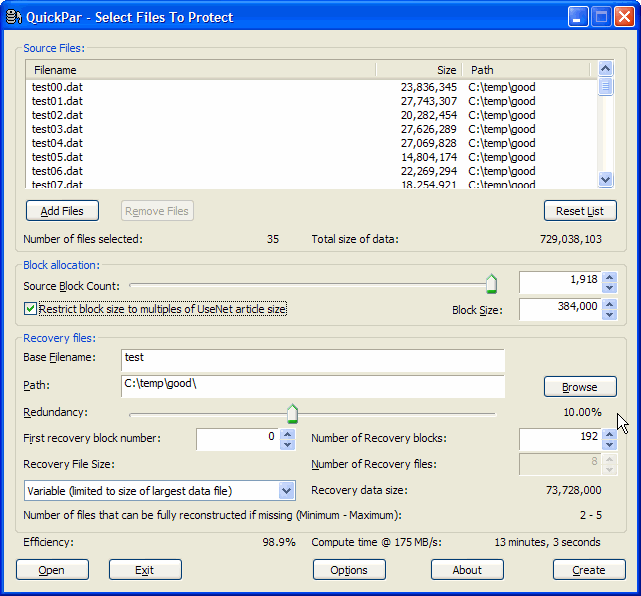
If you have configured Shell Integration via QuickPar's Options dialogue, then you can create PAR2 files for a set of files from Windows Explorer by selecting them, right-clicking the selection, and choosing "QuickPar / Create Recovery Volumes" from the context menu. Alternatively, you can start QuickPar directly from whereever you have placed it and use the "Add Files" button to choose the files from which you wish to create PAR2 files. You would then see the main dialogue that allows you to create new PAR2 files:
At the top of the dialogue, QuickPar displays the list of files you have selected and shows their sizes. It also displays a count of the number of files and the total combined size of all of the files. To add, remove or clear the list of files, just use the "Add Files", "Remove Files", and "Reset List" buttons. When you are choosing the files that you wish to protect, QuickPar will update the "Base Filename" and "Path" edit boxes below to suggest a base name to use for the recovery files and where they will be placed. You can directly amend these and/or click the "Browse" button to choose where to place them. Just below the list of files is are "Block allocation" controls which allow you to determine how many "virtual" blocks the files will be sliced into. There is a slider to allow course adjustments to the block count plus entry fields with spin controls to allow you to directly enter either the block count or block size. There is also a checkbox to restrict the block size to exact multiples of the size used to post articles on UseNet. You can set the size via the Options dialogue. If you are posting the files on UseNet, then it is recommended that you choose a block size that exactly matches the article size you plan to use. This will maximise the chances of those downloading the file being able to recover from damaged and lost articles. NB on computers with Celeron (or older) CPUs, using a small block size may require a long time to create the PAR2 files. you might therefore wish to choose a larger block size (as long as it is an exact multiple of the article size). If you do not choose a block size which is a multiple of the article size, recovery will still be possible but users may be forced to download more PAR2 files than they might otherwise need. In the screenshot above, you will see that the block size is set to 384,000 bytes (which corresponds to the article size you will normally get with yEnc and a line count of 3000). Below the entry fields for the name and location of the PAR2 files is a slider for setting the level of redundancy you wish to achieve. The slider allows you to set the redundancy anywhere up to 100% (which would allow complete reconstruction of all of the source files. The slider operates in a non-linear fashion allowing small values to be set very accurately and larger values less accurately. You may also specify the exact number of recovery blocks to be created via an entry field with a spinner. In the screenshot, QuickPar shows that 10% redundancy has been selected and that 192 recovery blocks will be created. There is also a spin control for setting the "First Block Number", this is used when creating additional PAR2 files. The "Recovery File Size" combo box allows you to choose between three different schemes for allocating recovery blocks to PAR2 files:
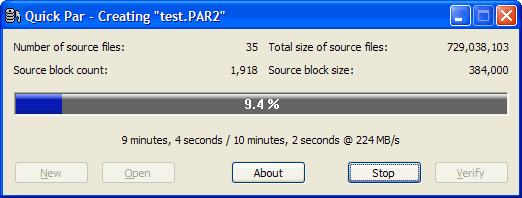
With the first option, the PAR2 files all contain different numbers of recovery blocks. Each successive PAR2 file has approximately twice as many recovery blocks as the previous one. This makes it easy to select a combination of PAR2 files that provide exactly the right quantity of recovery data when a repair is required. The second option is similar to the first option but limits the size of the largest PAR2 files created such that they contain exactly enough recovery blocks to repair the largest data file. When users are missing a whole file, they can download one of these large files and know that it will contain exactly the right amount of recovery data. The third option sets all of the PAR2 files to the same size. There are no small PAR2 files so users may need to obtain more recovery data than they actually need if the PAR2 files are large. Towards the bottom of the dialogue, QuickPar tells you how many data files the PAR2 files are capable of repairing. In the above example, it indicates that from 2 to 5 files may be fully reconstructed if they are missing. i.e. It could reconstruct either the 2 largest files, or the 5 smallest files (or some intermediate number for a combination of large and small files). There is also an efficiency rating of 98.9% displayed. This figure will drop if the block size is too large indicating that recovery blocks will not be fully used when repairing. At the bottom left you will note that a figure for Compute Time is displayed. This time is base on a speed estimate which QuickPar calculates on startup. This figure will change when you use both the "Block Count" and "Redundancy" sliders. Once you have selected the files you want to protect, chosen where to put the PAR files and decided what block count and level of redundancy you want, you can click the "Create" button to start the process of creating the PAR 2 files. Alternatively you can click "Exit" to exit QuickPar, or "Open" to open an existing PAR2 file (to verify or repair data files). When you click "Create", QuickPar will display the following window to show you the progress:
QuickPar displays summary information about the files that are being protected at the top of the window, shows a progress bar in the middle, and below that it displays an estimate of how long it will take to complete the process. You can click "Stop" to abandon the creation of the PAR2 files. Once QuickPar has finished creating the PAR2 files, if you wish to you can click the "Verify" button to have QuickPar use the newly created PAR2 files to verify the data files. When QuickPar creates PAR2 files it uses a filename that indicates how many recovery blocks the file contains and what the number of the first block is. The format used is "basename.volFFFF+NNNN.par2" where FFFF is the number of the first block and NNNN is the number of recovery blocks. In the above example, nine PAR2 files are created with the following names:
If you have damaged data files and are told that you needed 11 blocks of recovery data (to repair 4,125KB of damaged or missing data), then you need only obtain test.vol000+001.PAR2, test.vol001+002.PAR2, and test.vol007+008.PAR2 (totalling 4,444KB). QuickPar would then use the 11 recovery blocks in those 3 PAR2 files to reconstuct the missing or damaged data. The difference between the size of the PAR2 files and the size of the damaged data amounts to 319KB. This consists of copies of critical data that PAR2 uses to verify the files. You may also click "New" to create more PAR files, and "Open" to open an existing PAR file. |
|||||||||||||||||||||||||||||||
Copyright © 2015 Peter B. Clements. All Rights Reserved.